
Blog /
Build a DesignSetGo app from inside Claude.ai: the Connector walkthrough
The May 15 post walked the read surface: Claude Desktop talking to your WordPress site over MCP, listing posts, checking the current user, browsing apps that are already installed. That setup gave Claude eyes into the site.
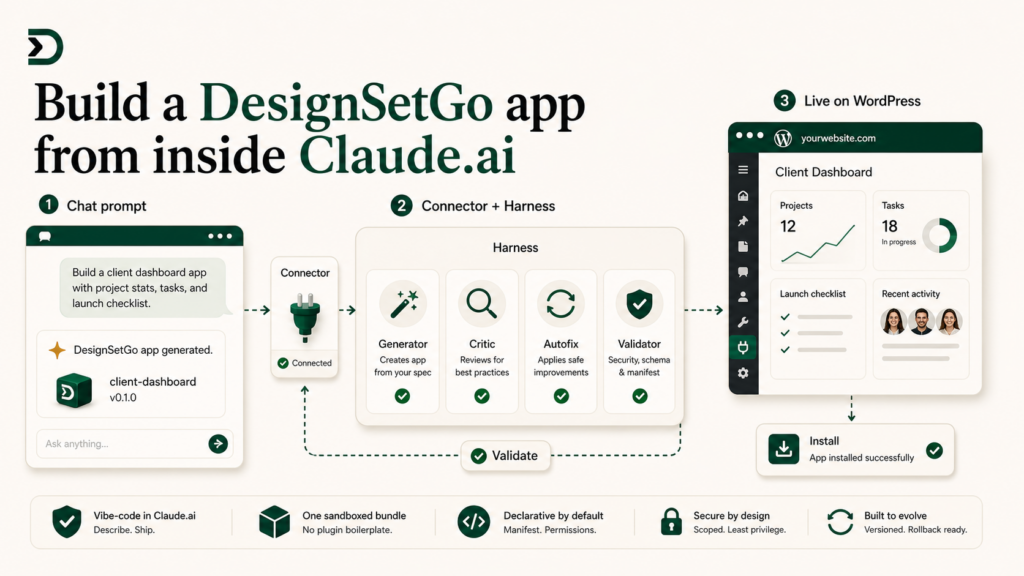
This post is the write surface. With DesignSetGo Apps Pro and a Connector configured in Claude.ai or Claude Desktop, you can ask Claude to build a new app, the harness writes it, the Connector installs it on your site, and you can preview the result without ever opening wp-admin or a terminal.
It is the shortest path from “I want a thing on my site” to “the thing is on my site.” Three minutes the first time you do it.
What you need
Three things:
- A WordPress site with DesignSetGo Apps Pro installed. Pro is what exposes the
dsgo/generate-appanddsgo/install-appabilities to the MCP adapter. The free tier exposes only the read-side abilities (covered in detail in the May 15 post). - The WordPress MCP Adapter installed and configured. This is a separate WordPress plugin maintained by the MCP community; install it from the plugin directory and configure it per the README. It is what bridges MCP requests to WordPress abilities.
- Claude.ai (Team or Enterprise tier) or Claude Desktop. Both support Connectors. The free tier of Claude.ai does not. If you are on the free tier and want to do this, Claude Desktop is the workaround.
Step 1: register the site as a Connector
In Claude.ai:
- Settings → Connectors → Add Connector.
- Connector type: MCP server.
- URL:
https://your-wordpress-site.example/wp-json/wp/v2/mcp/discovery(the standard MCP discovery URL the adapter exposes). - Authentication: WordPress application password. Generate one in wp-admin → Users → Your Profile → Application Passwords, name it “Claude Connector,” copy the generated password into the Connector setup.
- Save.
Claude.ai pings the discovery URL, lists the available abilities, and adds the Connector to your active connectors list. You can also restrict which abilities the Connector exposes (handy if you want the read-side but not the install-side at first).
In Claude Desktop, the flow is similar but happens in a config JSON file. The May 15 post walks the JSON shape.
Step 2: prompt
In a new Claude conversation, with the Connector active, type a prompt that describes the app you want:
Build a booking form for my consulting site. Show the next five available weekday slots from a hardcoded list of dates in the bundle. The visitor picks a slot, enters their name, email, and project description, then clicks submit. On submit, send me an email with the booking. Render it as a Gutenberg block so I can drop it into the “Work With Me” page. Style it like a clean professional services site.
Claude will:
- Recognize from your prompt that this is a DesignSetGo App build request.
- Call the
dsgo/generate-appability on the Connector. - The DesignSetGo Pro harness runs server-side on your WordPress site: generator writes the bundle, critic reviews it, autofix repairs any flagged issues, validator checks the manifest.
- The result returns to Claude as an “app preview” with the manifest, the file list, and a sandboxed render of the app.
- Claude shows you the preview in the conversation, with a “Looks good? I can install it on your site” prompt.
You review. If the app looks right, you say yes. Claude calls dsgo/install-app with the bundle. The site receives the install, runs the standard install dialog server-side (so the permissions are recorded but the dialog is collapsed because you approved it through the Connector), and the app is live.
You can also iterate. “Make the slot picker horizontal instead of vertical.” “Add a phone number field.” “Use a darker color scheme.” Each iteration is another harness run; the bundle is regenerated and replaces the preview.
Step 3: preview the result
The Connector’s response includes a preview URL. Open it. The app is live on your site at /apps/booking/ (or wherever you named it). Open your “Work With Me” page in the WordPress editor, add the DesignSetGo Apps block, pick the booking form, save the page. The form is now embedded in the page.
You did this without opening wp-admin until the final embed step. The whole authoring loop happened inside Claude.ai.
What the harness is doing
The harness post is the canonical reference, but the short version of what happens between your prompt and the installed app:
- The generator produces a draft bundle from your prompt, with the system prompt that knows about the bridge API and the manifest format.
- The critic reads the draft and flags issues: missing manifest fields, calls to undeclared origins, accessibility problems, suspicious code patterns (a hardcoded API key, a
localStorageuse wheredsgo.storage.useris the right call). - Autofix runs against the critic’s flags, regenerating the parts of the bundle that failed.
- The validator does the final check: the manifest parses, the bundle is well-formed, the declared permissions match what the code actually calls.
- Only validated bundles are sent back to the Connector. The validated bundle is what you preview and install.
The harness is also what makes the Connector path safe for site owners. The MCP adapter could, in principle, accept any arbitrary HTML bundle and install it. The harness on the WordPress side runs validation regardless of what the Connector sent, so a malicious or buggy bundle from anywhere upstream gets caught before it hits the site.
What the two doors mean
We call this “the two doors” architecture, covered in the demos list of the messaging brief. One door is the CLI (npx designsetgo apps init, Claude Code, deploy). The other door is the Connector (Claude.ai, conversation, install). Both doors lead to the same harness, the same install dialog, the same /apps/{slug} URL, the same bridge.
Different audiences use different doors. The Claude Code path is for P2 (developers in their terminal). The Connector path is for P1 (site owners in a chat). The fact that both produce the same artifact is the point: the choice of door is a UX choice, not a capability choice.
What it does not do (yet)
Three honest limitations.
Multi-step app authoring. Some apps are big enough that a single prompt does not produce a working bundle. The Connector path handles iteration (“now add this field,” “now change this color”), but it does not yet handle “start a new conversation, pick up where the previous one left off.” You can open the bundle in Claude Code if you need to iterate over many sessions. The Connector path is best for apps you can get right in one conversation.
Custom external API access. If your app needs to call an API the harness has not approved, you would need to declare the origin in the manifest. The Connector path will currently warn and ask you to confirm; the manifest field can be edited in the preview before install. If the API needs an authentication header you do not want Claude to see, you should configure the API as a Connector on the WordPress side and have the app call it through the bridge.
Production hardening. A Connector-installed app is a good MVP. For an app that becomes mission-critical, you probably want to drop into the CLI workflow at some point: version-control the bundle, set up CI deploys, add tests. The Connector path is the on-ramp, not the destination.
The shorter version
DesignSetGo Apps Pro plus the WordPress MCP Adapter plus a Connector in Claude.ai (Team/Enterprise) or Claude Desktop lets you build, preview, and install an app on your WordPress site without ever opening wp-admin or a terminal. The harness runs server-side regardless of which door you came in through, so the safety story is the same.
If you have not set up the Connector yet, start with the May 15 walkthrough. It covers the read side, which is the prerequisite for the write side.
Further reading
- The harness: what makes AI generation trustworthy on WordPress: the architectural deep dive.
- Connect Claude Desktop to WordPress with MCP and application passwords: the read-side prerequisite.
- docs/messaging-brief.md “Two doors, one app”: the strategic framing.